
This article is designed to guide you through the entire process of arranging folk tunes on the fingerpicking 5-string banjo. I’ll be talking you through the thought processes, and techniques, that I would use, as well as helping you to build up some useful skills along the way. I’ve always felt there was a bit of a leap between the simplified versions of tunes that you might learn initially, and the complex, inventive arrangements that a skilled folk band would put together. Hopefully, I can help you bridge this gap.
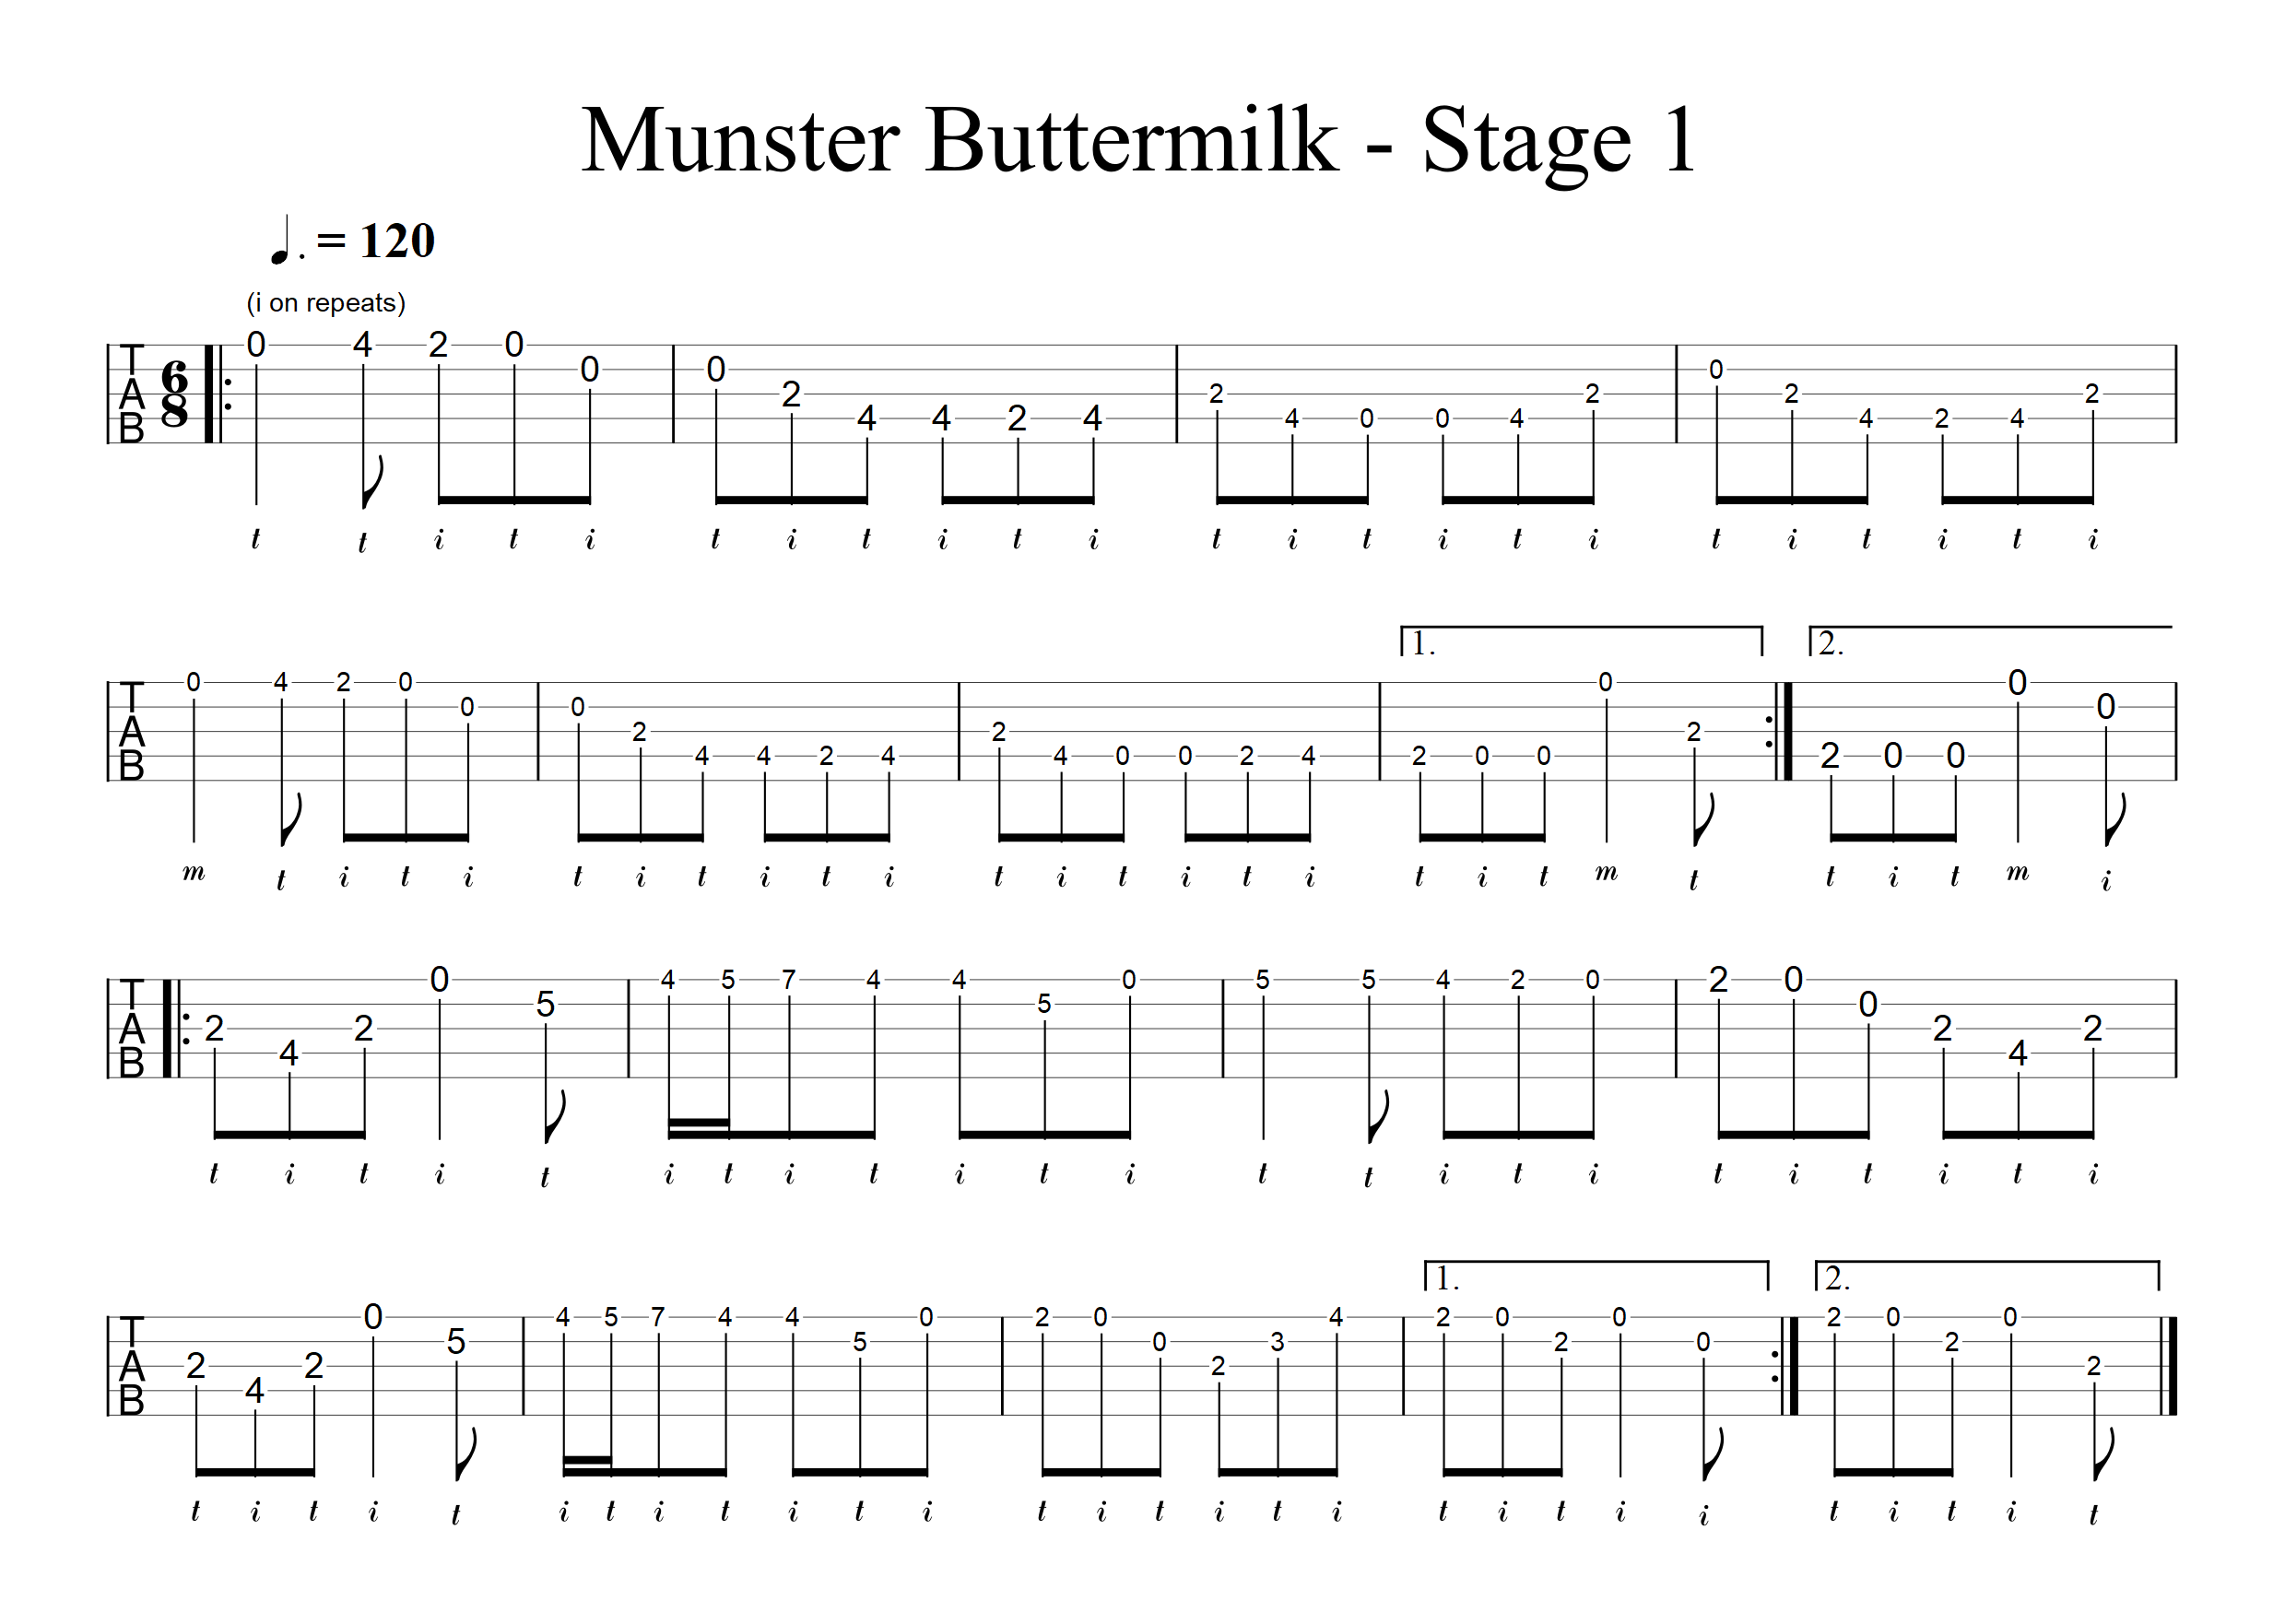
We’ll be working on a traditional Irish jig in D major, Munster Buttermilk. Jigs are played in 6/8 time, with the bar divided into two sets of three eighth notes (1 2 3, 4 5 6). When playing along with a metronome, the click will land on the beats highlighted in bold – the first quaver of each group of three.
If you find this guide useful, you may enjoy my new book, which goes into more depth and features a wide variety of tunes. It is available here.
Stage 1 – Learning the Basic Melody
Before we can get creative with the arrangement, we first need to work out the basic notes of the melody. This can either be done by ear or by using sheet music.
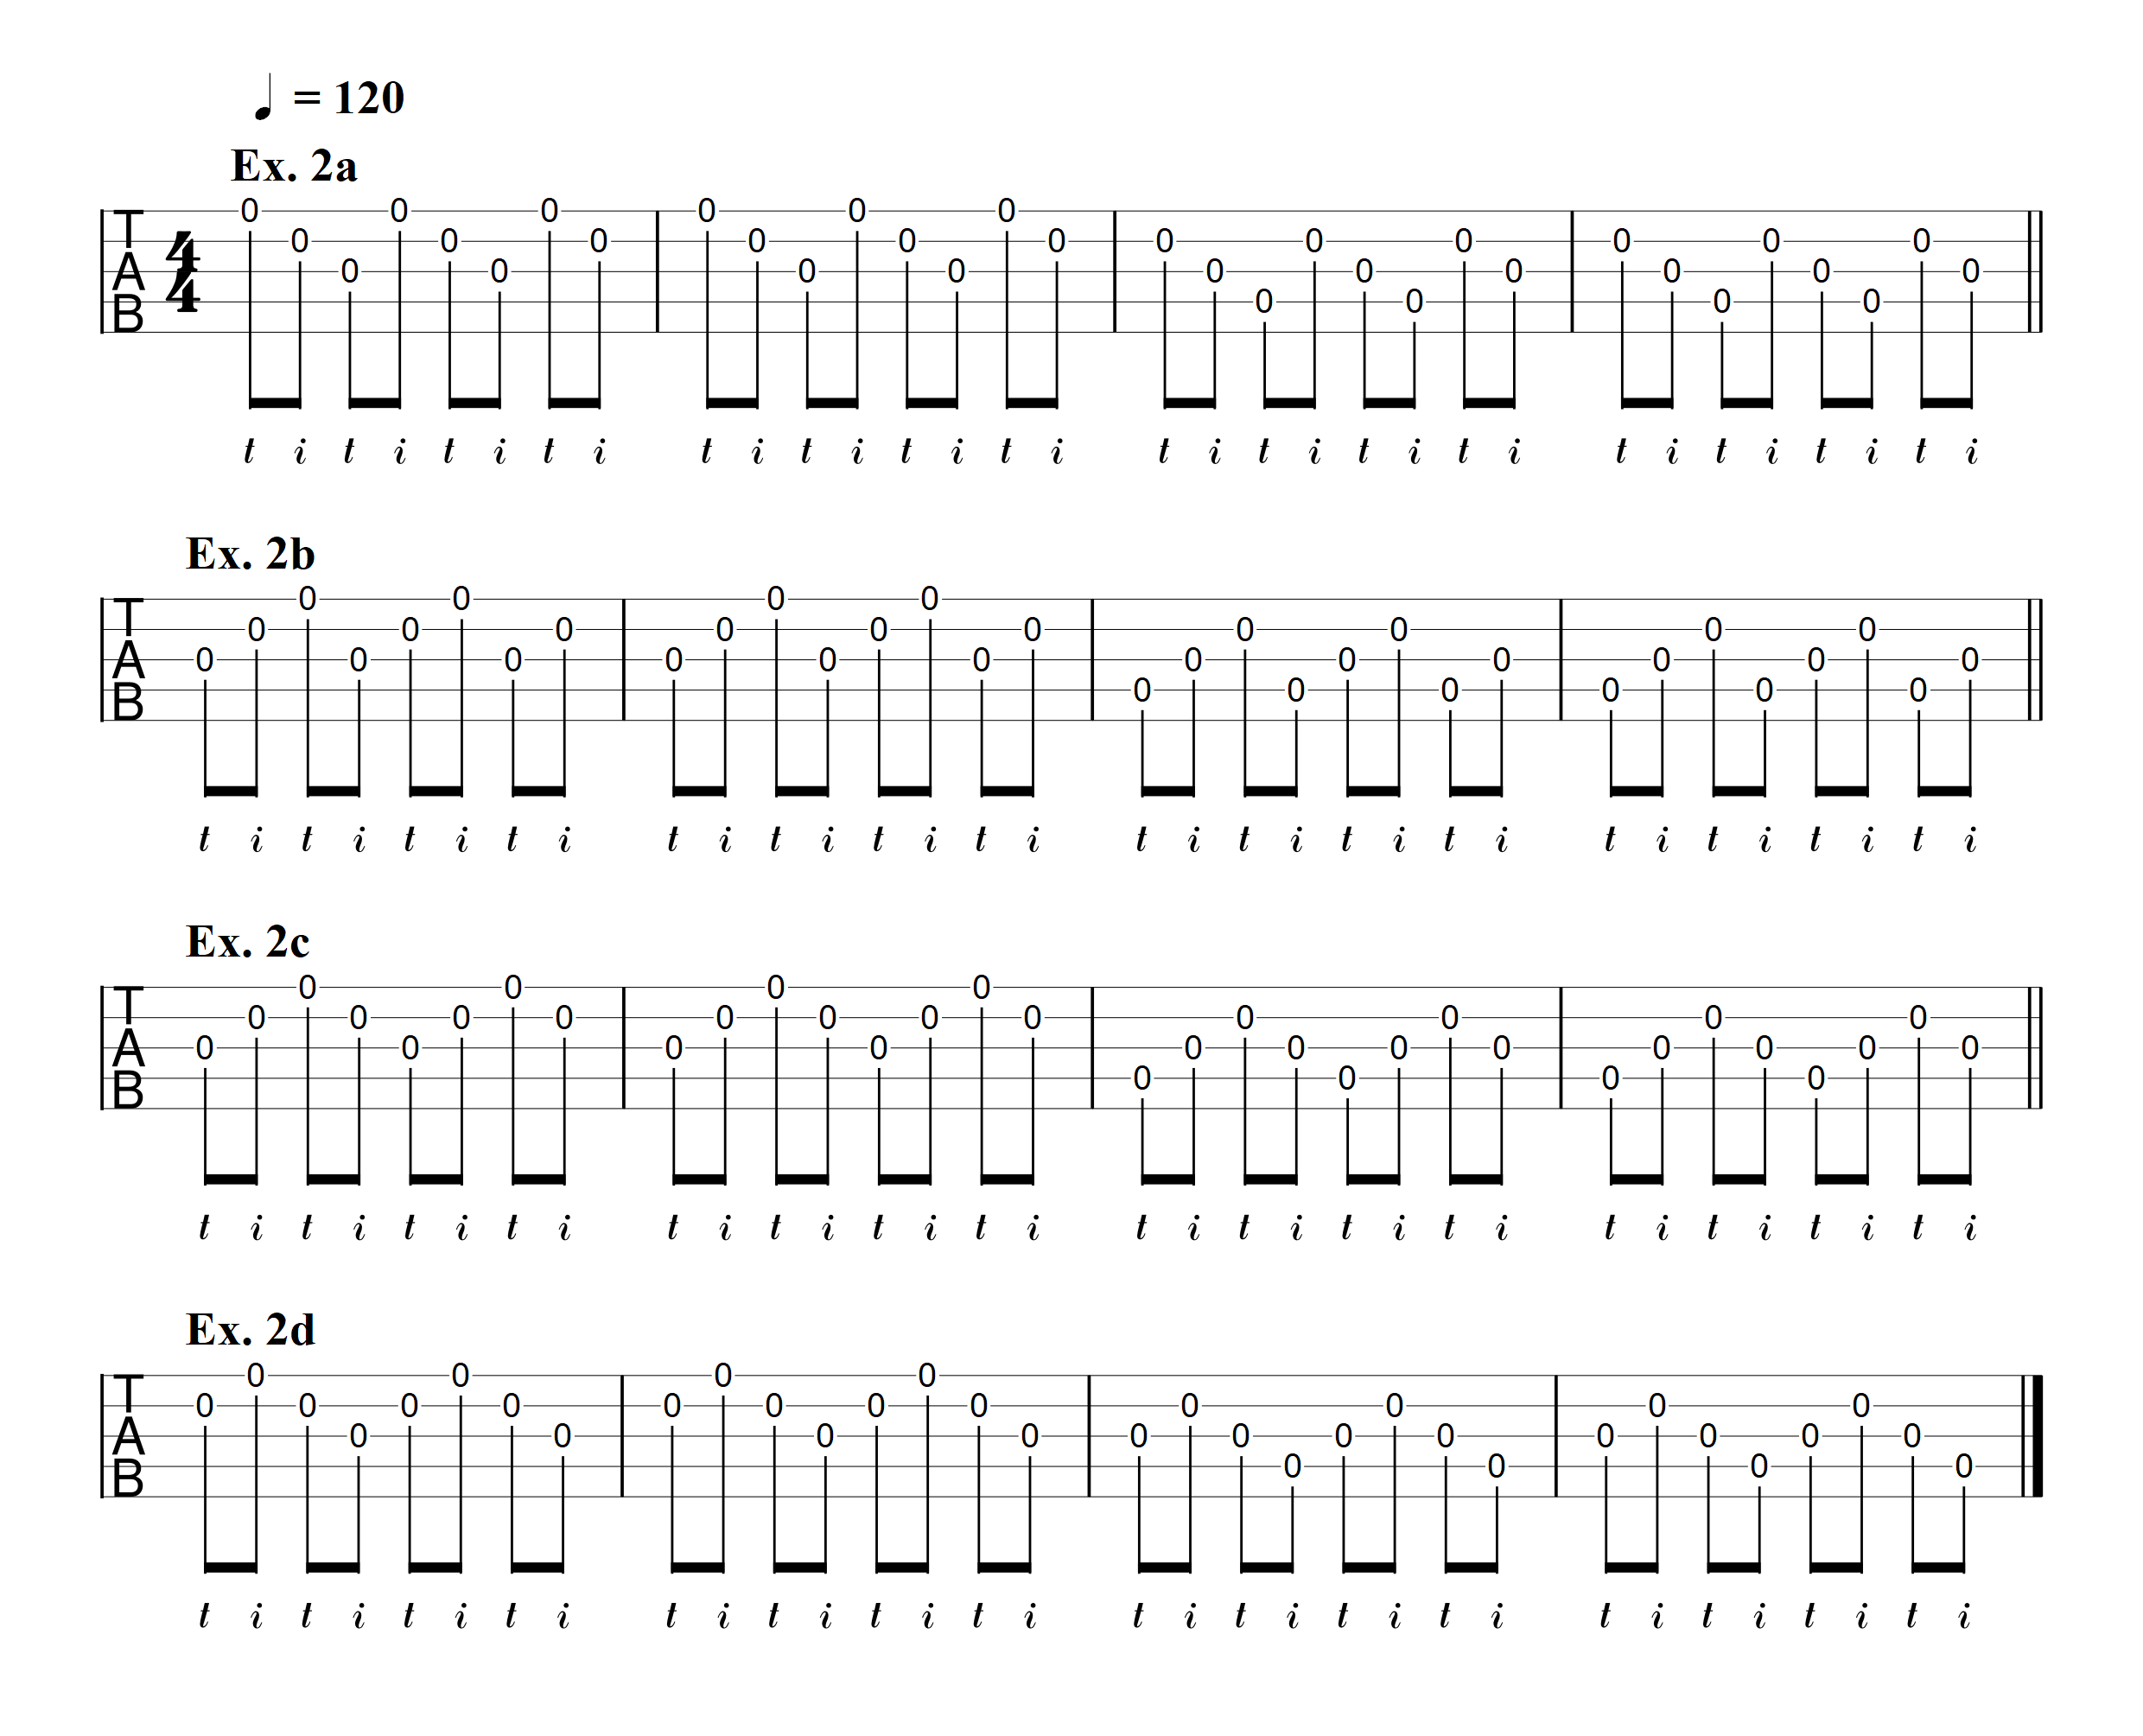
At this stage, I like to use alternate picking to work my way through the melody. In alternate picking (also known as “single string”), the picking hand acts like a plectrum, with the thumb making the down-stroke, and the first finger making the up-stroke. So, the “down, up, down, up” motion of flatpicking becomes a “thumb, first, thumb, first'' picking pattern. This results in a defined, tenor banjo-like sound, and makes it easy to play multiple consecutive notes on the same string. Crucially at this point, it reduces the mental workload and allows us to concentrate on simply learning the notes. This is because, after a lot of practice and drilling, alternate picking style should become an automatic movement that doesn’t require much conscious thought. Melodic style, which we’ll cover later, often results in more complex picking-hand fingering.
Having said that, I don’t mean to suggest that alternate picking is inherently easier, but it is a technique that benefits from building up muscle memory. So, here are a couple of alternate picking warm-ups from my book that should help you develop this skill if you haven’t come across it before. The first exercise focuses on syncing up the left and right hand. The second focuses on string crossing, which is one of the biggest challenges of this style. There is also an example video showing them both in action.
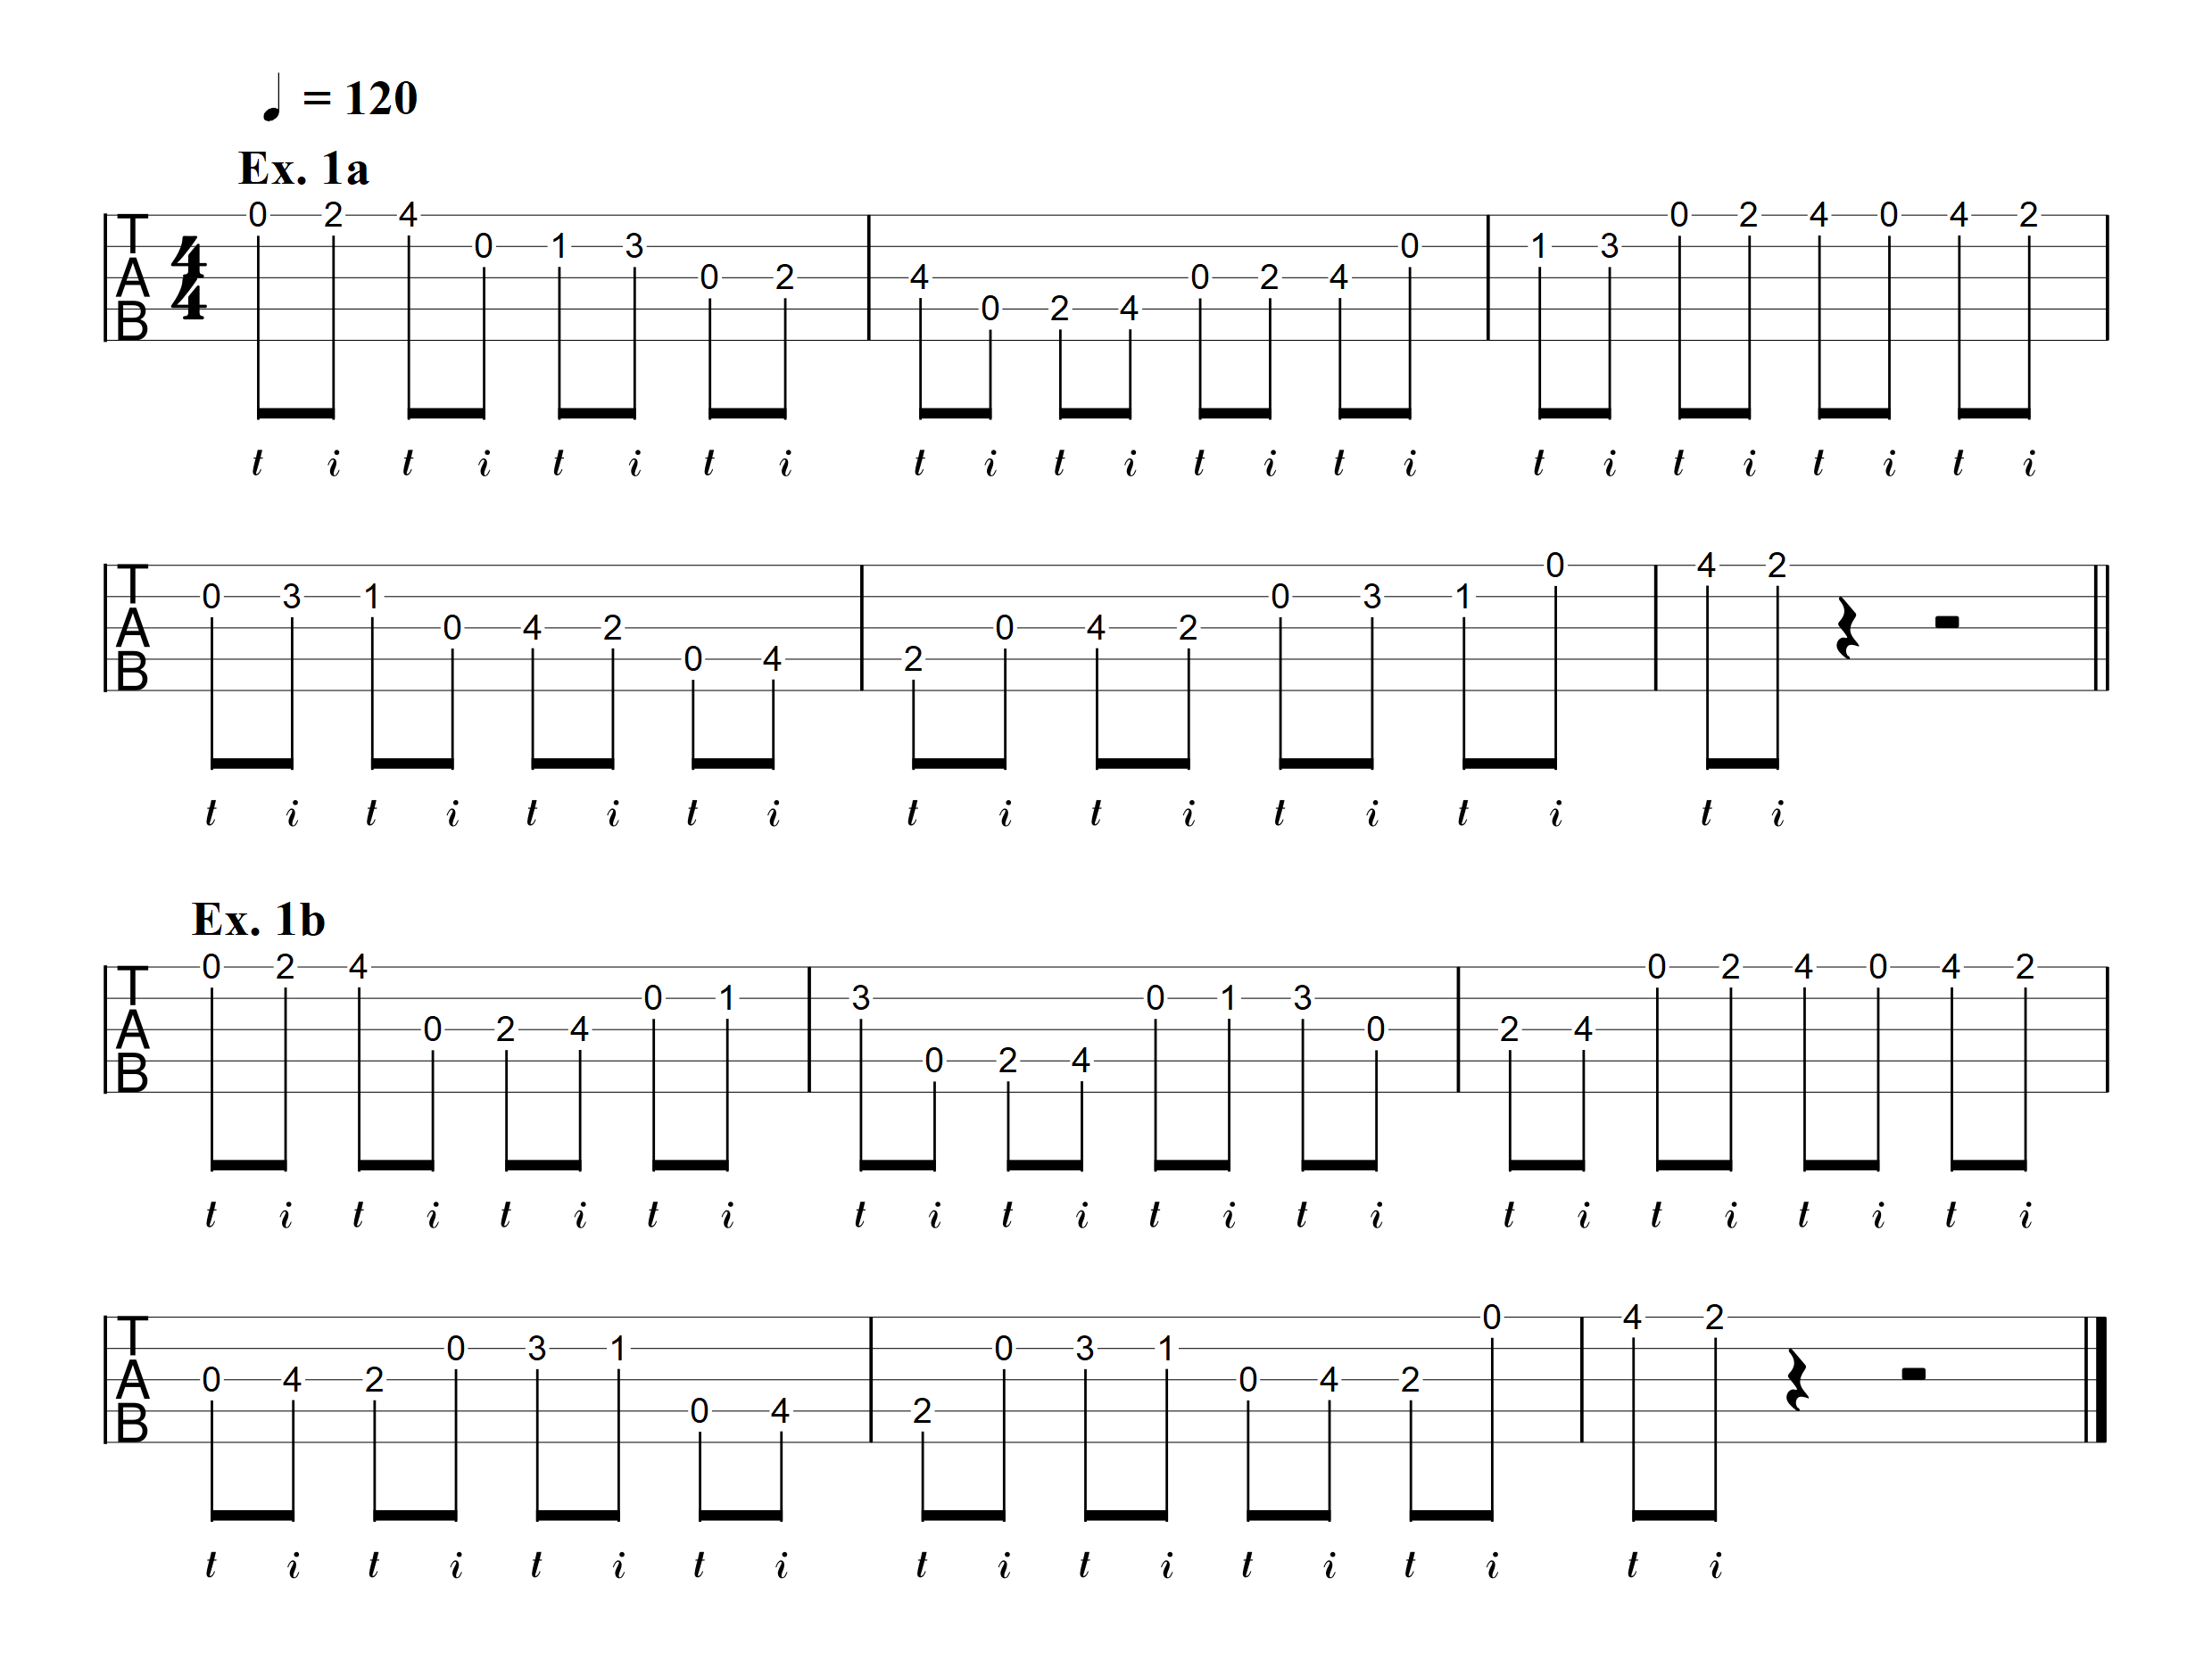
One advantage we do have over our flatpicking friends is the ability to occasionally use our middle finger to avoid a big jump. You can see an example of this in the transition between bars 4 and 5 below. Anyway, now that we’ve polished up our alternate picking technique, let’s look at the basic melody:
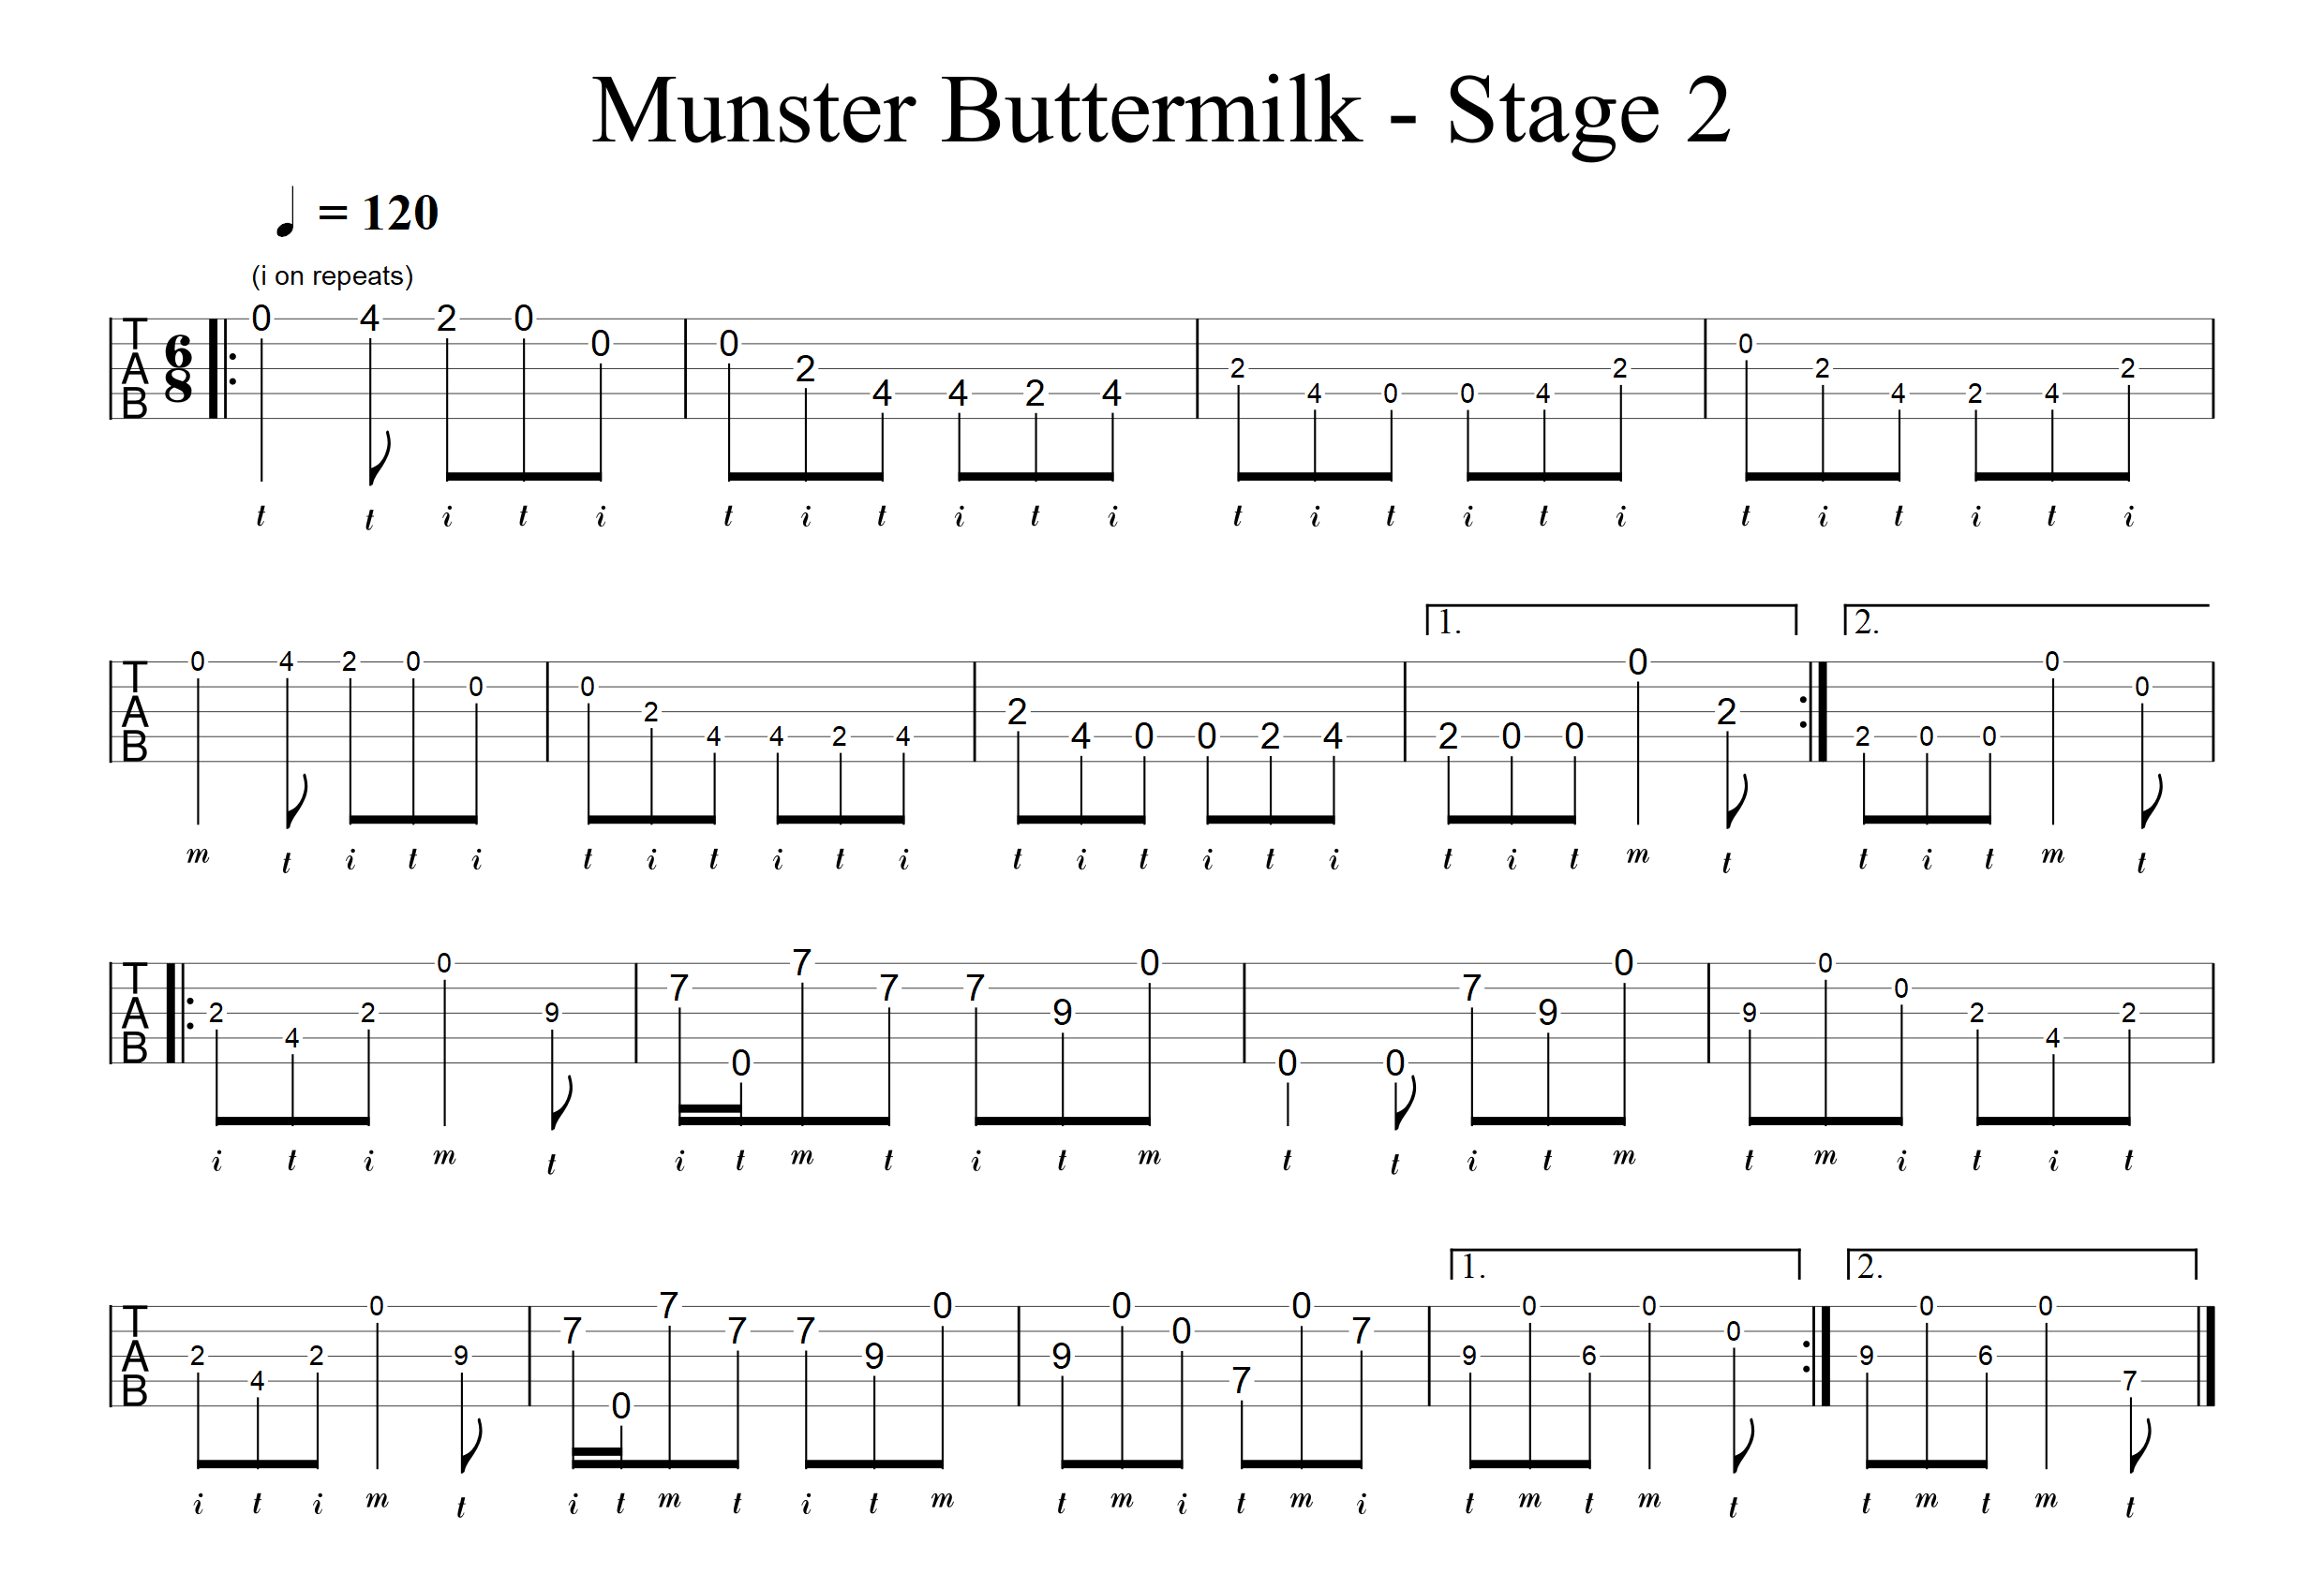
Stage 2 – Incorporating Melodic Style
Melodic style playing is another technique that we can use when tackling a tune. In melodic style, we generally avoid playing consecutive notes on the same string. Instead, we hold down shapes with our fretting hand and make maximum use of open strings to achieve a flowing, legato sound. We also use open strings as “bridges” – notes that ring out as we move to a different position to maintain the smooth flow of notes. To my ear, this sounds reminiscent of the Celtic harp, with the sustained notes overlapping each other.
Because it contrasts so strikingly in sound with alternate picking, melodic style is an extremely effective way to inject variety and tonal interest into a tune. We’ve brought it in at this point because the right-hand fingering often requires a bit more forethought than alternate picking, but it is actually no harder. In fact, it often works out easier.
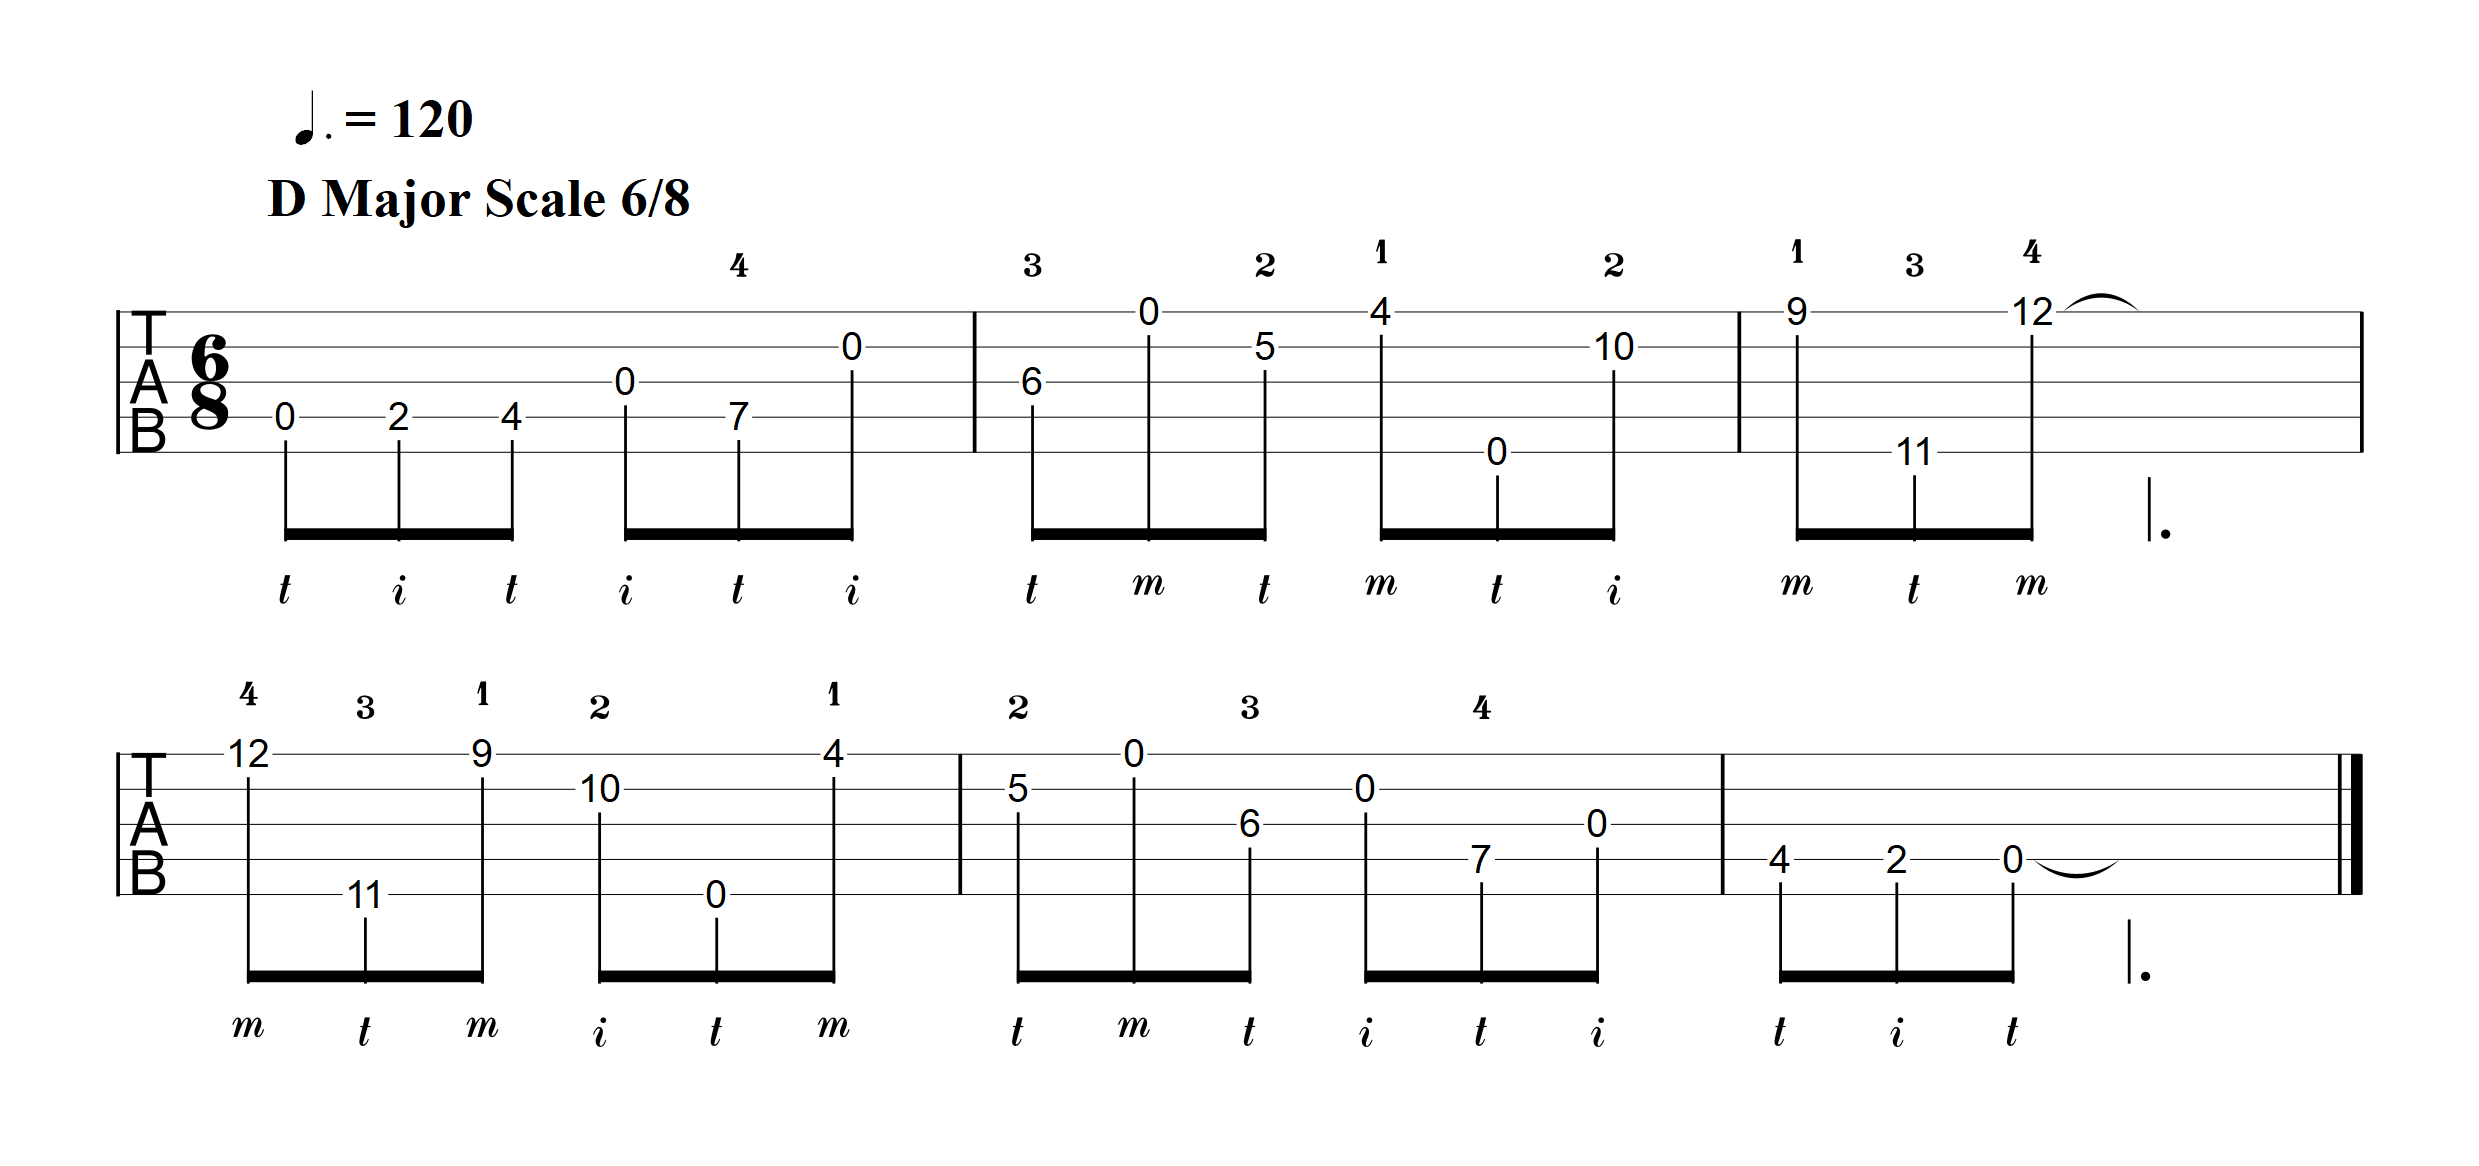
To keep things simple and maximize the contrast, we’ll play the A section of the tune the same way, in alternate picking style, then move to melodic for the B section. I often find switching to melodic style for a B section is very effective, and it’s one of my go-to “quick fixes” when arranging a tune. But first let’s warm up and learn the basic shapes, with this D major melodic scale.
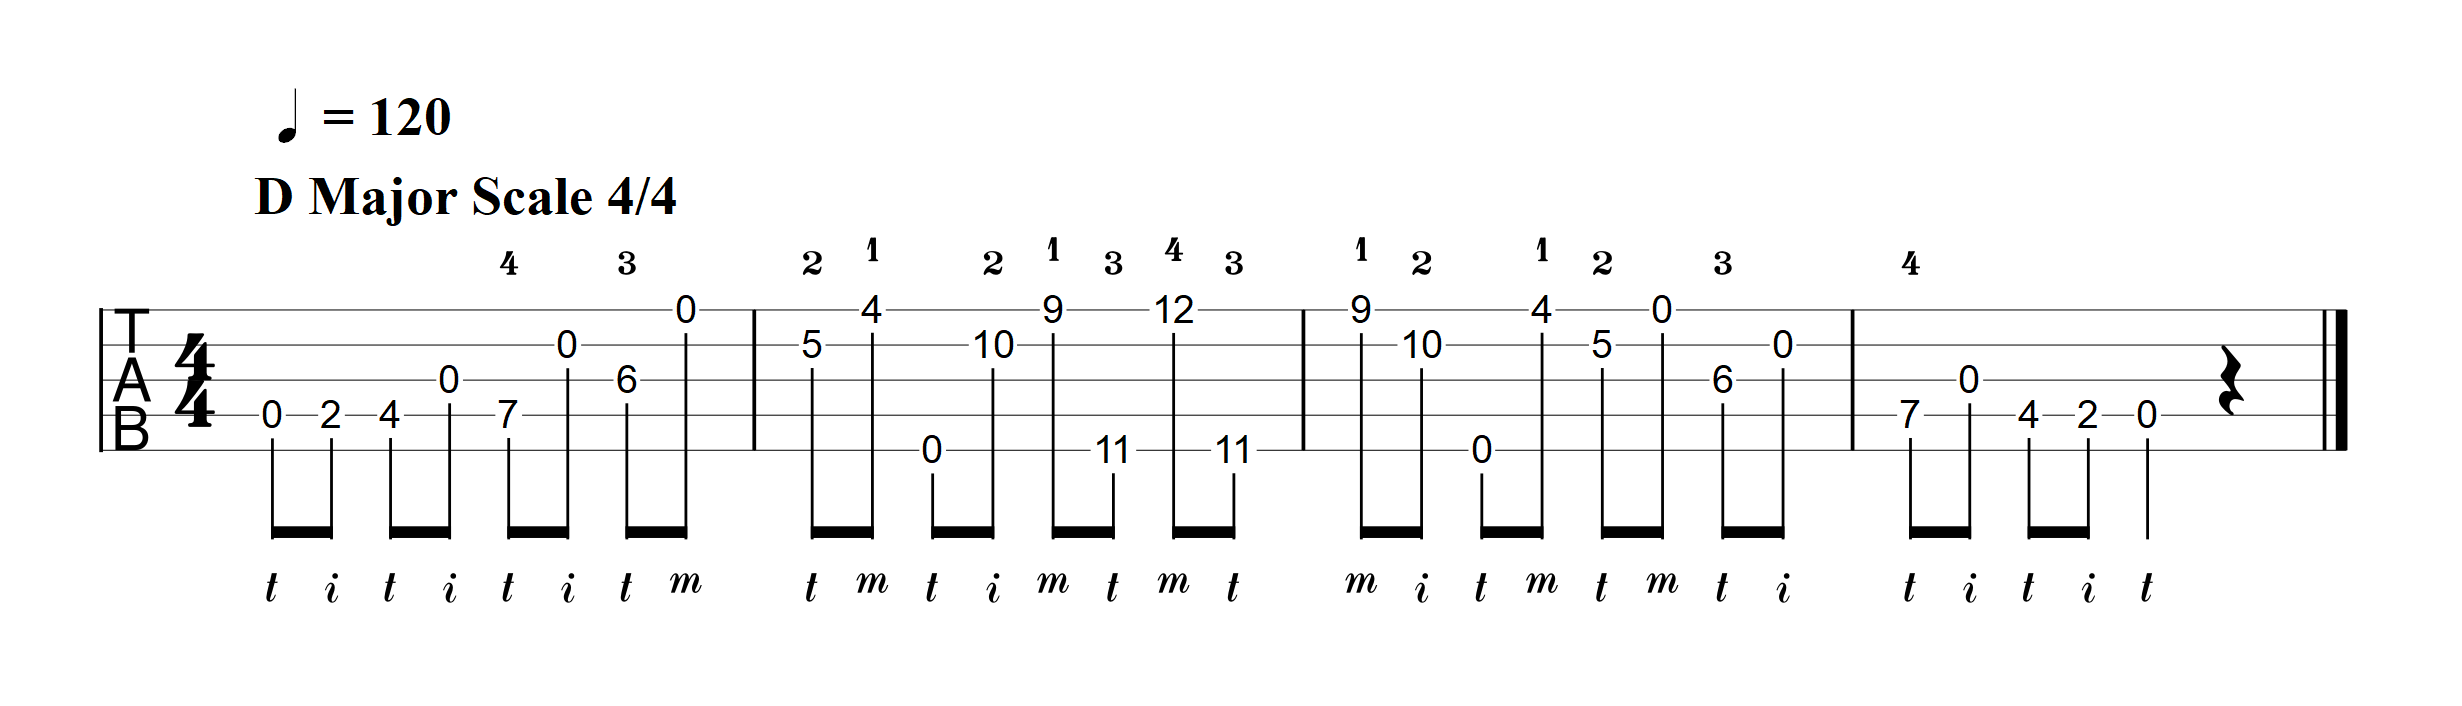 You could also try playing it in 6/8 to get used to the jig time:
Now onto the tune:
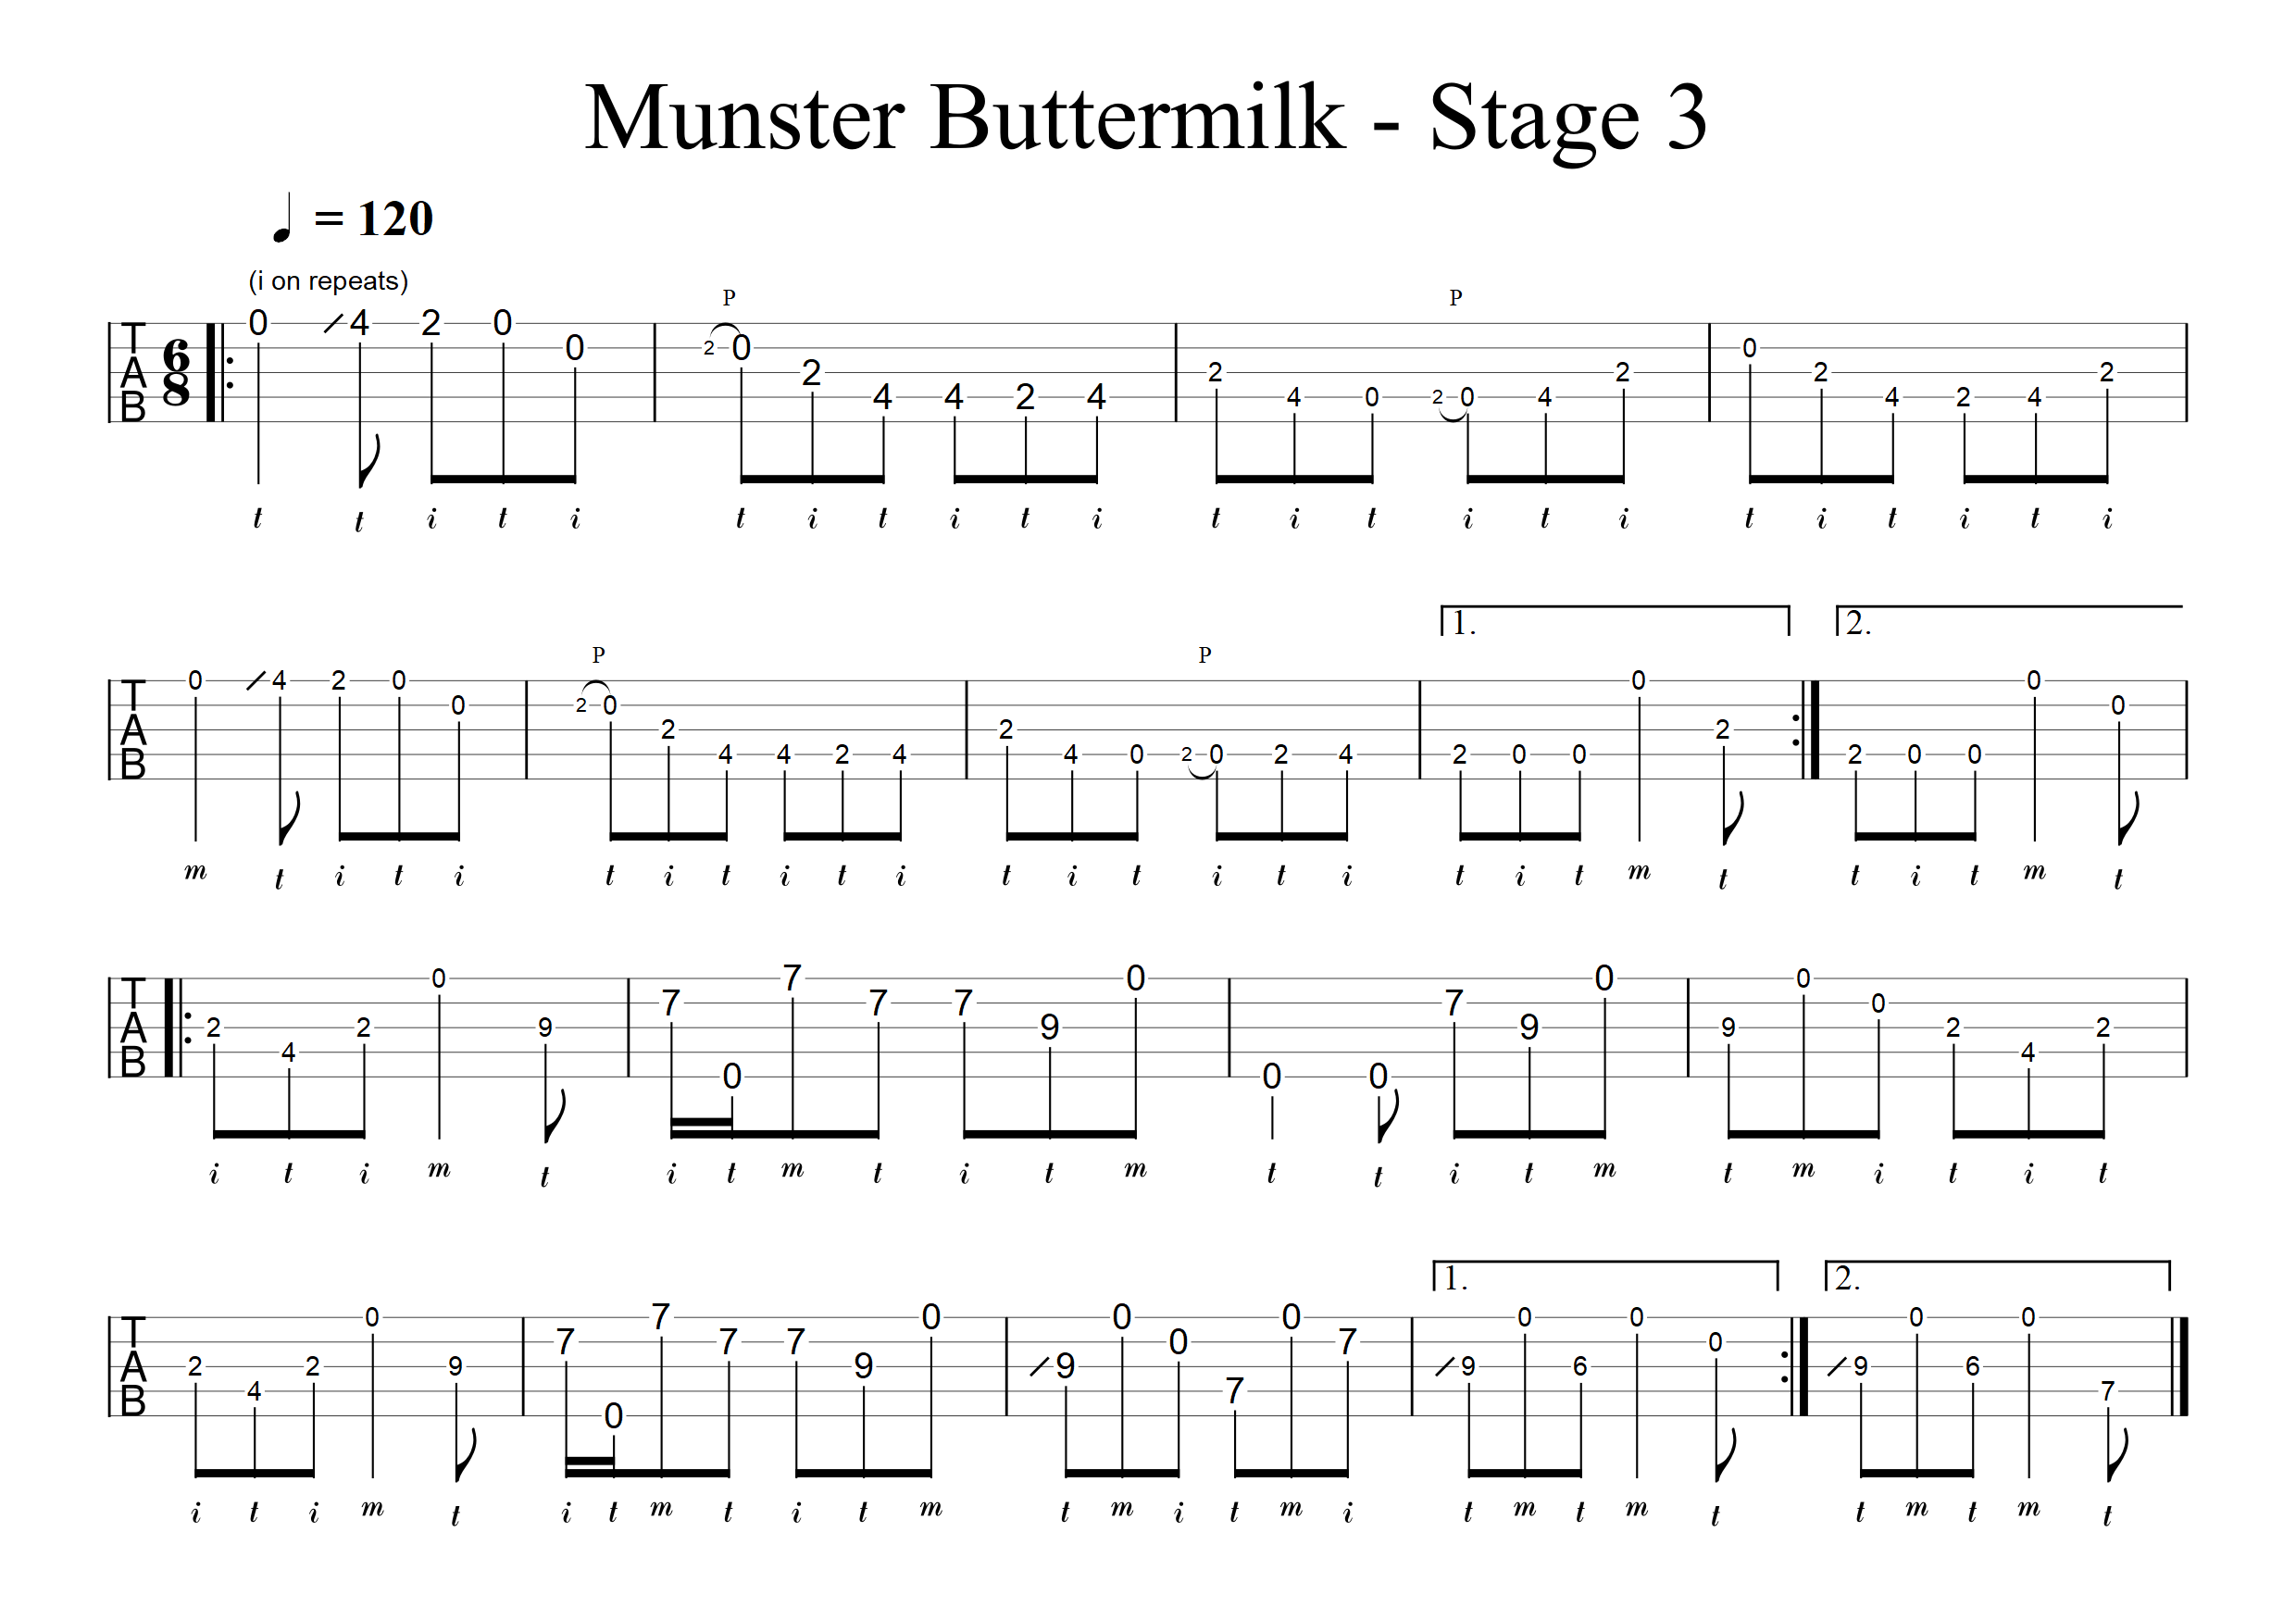
Stage 3 – Adding Simple Ornamentation
If you listen to traditional Irish or Scottish folk music, you’ll soon realize that the tune is almost always full of little embellishments, or ornaments. These can give the melody notes a different flavor, help drive the melody along, or simply add variety to repeated passages (folk tunes often have a lot of repetition). Some of these ornaments are easier to incorporate than others on the banjo, and we’ll start with what I think of as the simple ones – grace notes and slides. Adding them in won’t affect the picking-hand fingering, so they’re pretty easy additions once you have the tune nailed down.
We want to get the grace note hammer-ons and pull-offs sounding fast and light, giving just a hint of the first note. The grace note itself should barely be heard – it simply imparts a new flavor to the melody note that follows. In this way, they differ from bluegrass hammer-ons and pull-offs, which should be rhythmic and precise, with both notes being clearly distinguishable.
The slides may also feel slightly different to the ones used in bluegrass. Again, the first note (the note you’re sliding from) should be barely perceptible. Because of this, the fret you slide from isn’t actually that important, and often just one fret will do the trick.
So, let’s add them into the tune arrangement! At this point, the tune is sounding pretty close to a finished arrangement and would sound great in a session or jam.
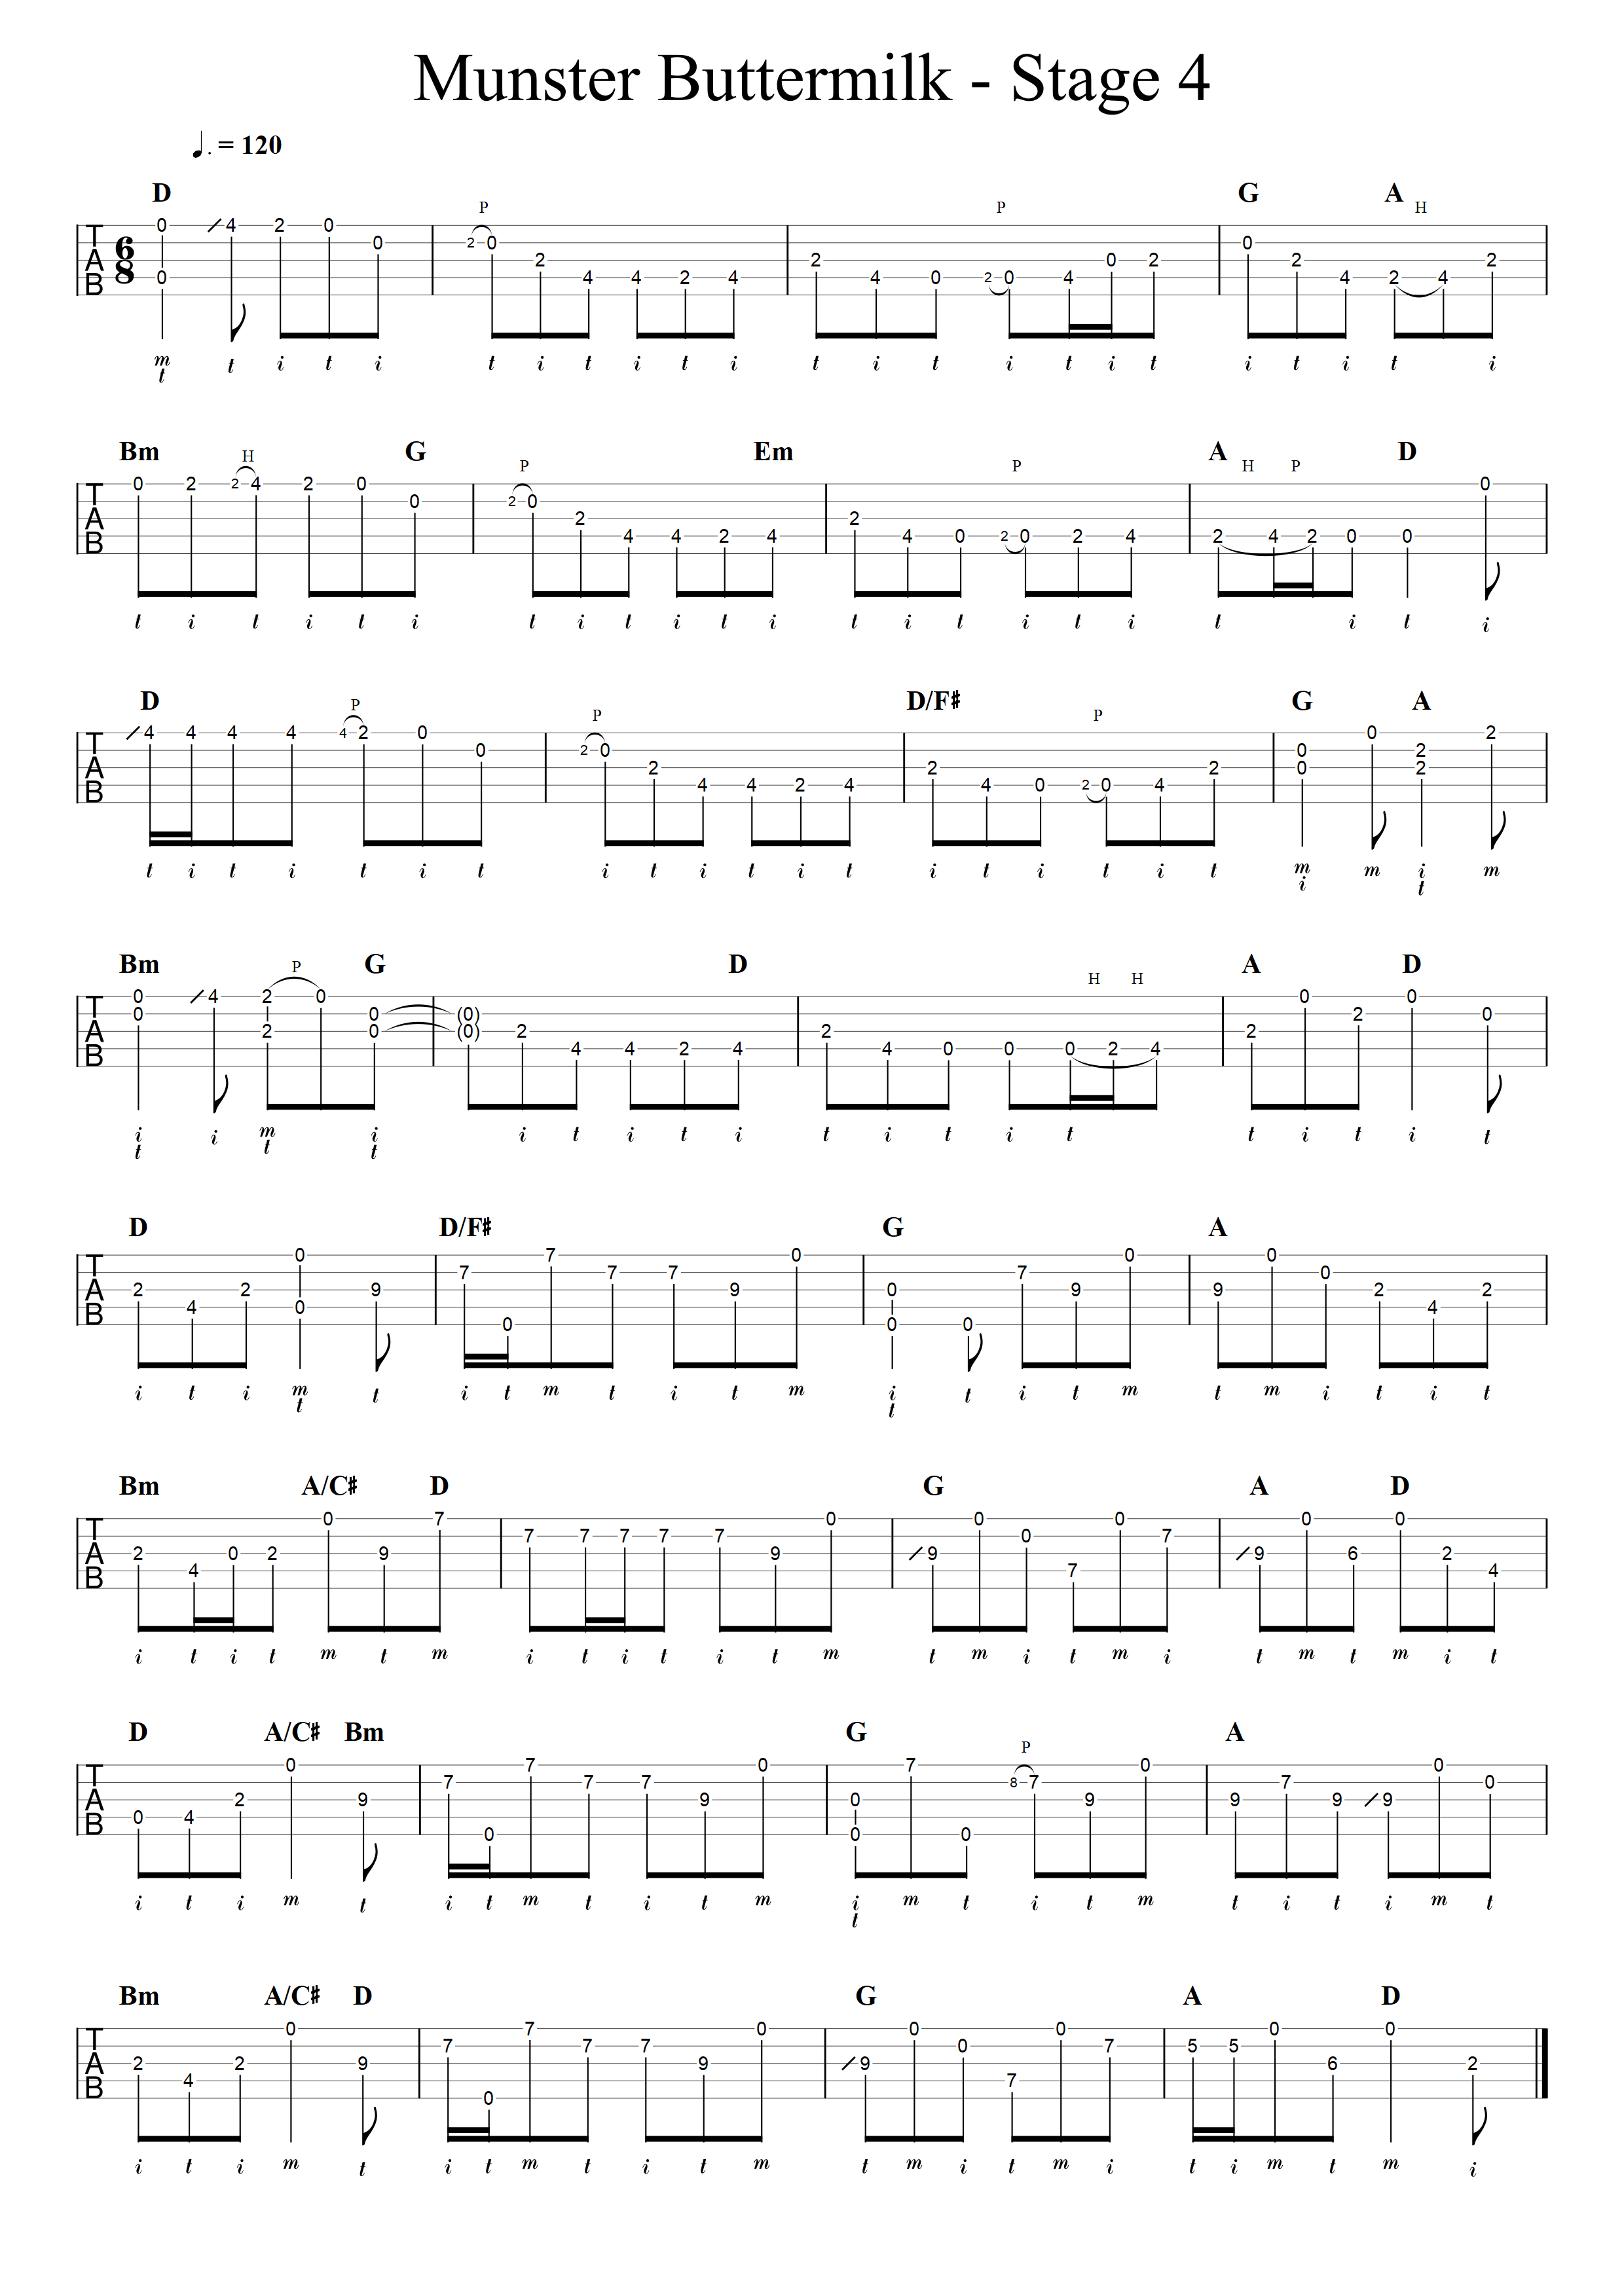
Stage 4 – Adding Triplets, Harmony Notes and Variations
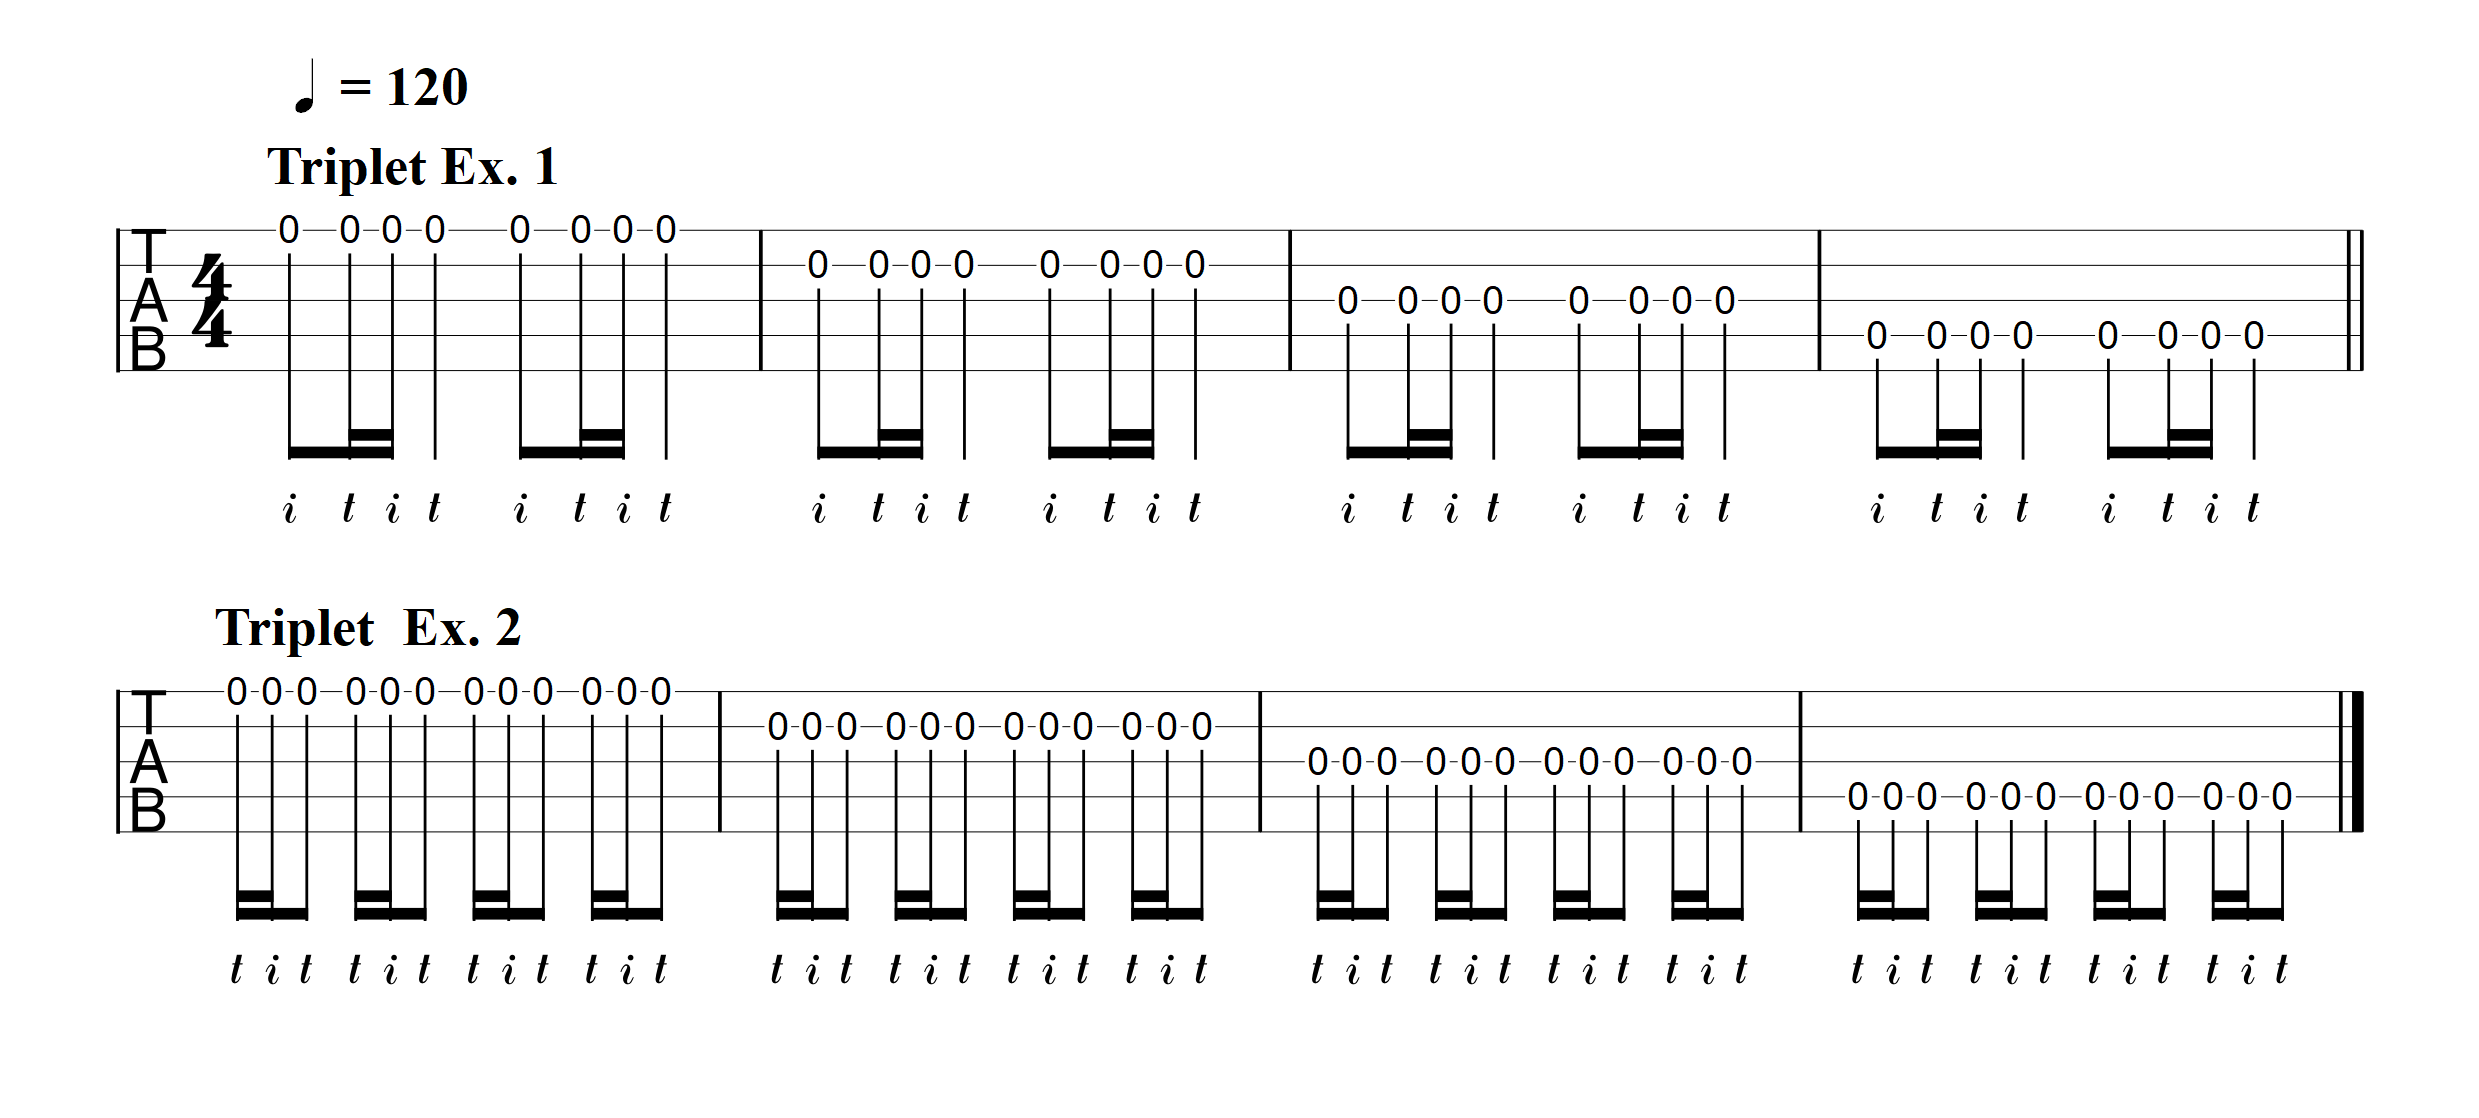
Another extremely important technique when aiming for an authentic sound is the triplet. In fact, what we call a triplet in Irish folk music is more accurately written as two sixteenth notes and an eighth note. However, this doesn’t exactly roll off the tongue, and the end result is the same – we fit three notes into the space of two. So, we call it a triplet.
There are many ways to achieve this sound. Plenty of incredible modern players have gotten there by using a thumb, first, middle pattern on a single string. If this works for you then go for it! Personally, I find it hard to get this consistent and accurate on the low D and middle G strings, so I play triplets using just my thumb and first finger, basically speeding up the alternate picking pattern. This results in the picking-hand fingering changing, so I consider it a more complex ornament, which requires some forethought to incorporate.
Here is a little exercise to get acquainted with the technique:
If you know the chord sequence, you can also add in supporting lower notes to fill out the sound. This is much easier in friendly keys like G major or D major, where the open strings will often appear in the chords. Again, this will affect your picking-hand fingering and so you need to do a little bit of advance planning, to figure out where you can get them in, and where they sound effective rather than distracting. I’ve included the chord sequence in the TAB below at this point, in case you want to try your own.
Finally, it’s time to discuss variations, by far the most subjective part of the process. They can help add variety and a sense of progression to the melody, but they require all the tune players (and often the rhythm players) to be aware of them and in sync. This is probably one of the most noticeable differences between an arrangement a band has practiced ahead of time, and a version you’d hear at a jam or session. Often, you’ll begin adding in these variations when you repeat the tune so that the listener has time to hear the basic melody. So, if you were to put together a band performance of the tune, the “Stage 3” version above might work well for the first time through. Then, the second time round, you could do something like the “Stage 4” version below.
There are no hard and fast rules when adding in variations, but you’ll generally want to emphasize the same important melody notes as the original tune, whilst adding in more melodic movement around them. Knowing the chord sequence is also important at this point, as it will inform which notes you add in. For example, over a D major, the D, F# and A notes will sound “right” as they won’t clash with anything in the chord.
Spending some time absorbing the tradition will help to give you an instinctive feeling for where to add these variations and ornaments, but you shouldn’t be afraid to be creative and put your own stamp on things (although you may want to warn the other players if this will involve an extended chromatic jazz-fusion exploration).
Hopefully, some of these tips and tricks will come in useful on your own musical journey. Best of luck, and happy picking!


COMMENTS